Sunday, March 31, 2013

Pizza Rustica


If you're Italian and do not eat this on Easter, SHAME ON YOU!  Easter is definitely my favorite food holiday - and pizza rustica is the main reason why.  Meat.  Cheese.  More meat and more cheese, all bundled in a sweet dough.  #drool  (Side note: The manicotti, peeps, chocolate covered marshmallows and Italian cheesecake don't hurt either!)

No doubt it's a week worth of calories, but, hey, we only it eat once a year!

Pizza Rustica
adapted from Nick Malgieri

My sous-chef.

Filling the shell.

Makes 1 12-inch pie

Sweet Dough

3 cups flour
1/2 cup sugar
1/2 teaspoon salt
1 teaspoon baking powder
12 tablespoons unsalted butter, cold
3 eggs, beaten

Filling

2 pounds ricotta**
6 eggs
1 teaspoon freshly ground pepper
1/4 teaspoon freshly ground nutmeg
1/4 cup grated Pecorino Romano
1 pound mozzarella, coarsely grated
1/2 pound sweet dried sausage, peeled and diced
1/2 pound prosciutto, shredded
1/2 cup chopped parsley

Egg Wash

1 egg
1 pinch salt
Hawaiin sea salt, optional

**Use a good store-bought ricotta.  It should be on the "dry" side.  If it's very moist, drain the excess water using a cheese clothe.

Spray a 12" straight-edged pan with non-stick baking spray.

For the Sweet Dough, combine dry ingredients in bowl of food processor and pulse several times to mix. Dice butter and distribute evenly over dry ingredients. Pulse until very finely powdered. Add eggs and continue to pulse until dough forms a ball that revolves on blade.  Dump dough onto a clean work surface and, in as few motions as possible, give a couple of kneads to fully incorporate the dough.  Press into a disk, wrap and chill.

For the Filling, place ricotta in a mixing bowl and stir in eggs one at a time; stir in remaining filling ingredients in the order listed, mixing only long enough to make sure everything is evenly distributed.

Preheat oven to 350 degrees and set a rack in the lower third. Divide the Sweet Dough into 2 pieces. Roll 1 of the pieces thinly to line a 12-inch straight-sided cake pan. Pour in filling and smooth top. Roll the remaining dough to a 12-inch square and cut into 1-inch strips.   Create a lattice work over the filling.  Press strips at rim of pan to adhere and trim away excess dough even with top of pan.  For the eggwash, mix the egg and salt.  Using a pastry brush, paint the lattice and crust.  Sprinkle with Hawaiin sea salt, if you'd like.

Bake until the filling is set and the dough is baked through, about 45 minutes. Cool in the pan on a rack. To unmold, place a platter on top and invert, removing pan. Replace pan with another platter and invert again, removing top platter. Serve at room temperature or chilled. Refrigerate any leftovers.


Ready for the oven

Friday, March 22, 2013

Pierre Herme


Macarons, the new "it" thing.  Everyone is going crazy for them like someone just created them for the first time.  That's the thing with this industry...  trends, trends, trends.  (At least cupcakes and cake pops are on the decline!)

First things first, let's make sure we're all on the same page.  I am not talking about a mound of shredded coconut (macarOOn).  I am referring to the delicate French cookie.  A macaron should have a beautifully smooth, hard outer-shell with a chewy soft inside.  They are typically filled with a buttercream, ganache, or jam.  

When I was in culinary school, and macaron day came along, I was very excited.  At that point I had never had one!  Everyone makes a big deal about how hard they are to make - and, don't get me wrong, it's not the easiest thing to make, but with some practice, they're not too bad.   Anyway, when they were finally ready for consumption, I was not as impressed as I thought I would be.

Fast forward.

One of my best friends, Ange, and I were in Paris getting ready to go on a bus to head to Versailles, when, out of the corner of my eye, I saw a sign for Herme.  Pierre Herme - one of the most renown pastry chefs in the world.  We had a few minutes to kill so we headed in.  The place was beautiful.  Everything looked perfect.  I decided to give macarons another shot.  If I didn't like these macarons, I wasn't going to like any macaron.  I chose a pistachio, a vanilla and, because it looked so elegant, a chestnut.  I was BLOWN AWAY!  It melted in my mouth.  Ange, too, was impressed.  (She even bought a couple hundred dollars worth to take home!)  In the corner of the store was a little table with a simple stack of books.  The Macaron Cookbook.  It was all in French but I bought it anyway.

Fast forward, again.

I never made anything from the book.  First of all, I do not know anyone who speaks fluent French, and, on top of that, the directions are so persnickety that I just didn't have the patience - until NOW!  This past Christmas, my cousin's best friend, Christine, bought me the translated version.  It's been sitting in my room for weeks untouched.  It wasn't until recently Christine returned from Paris with a batch of Herme's macarons that I couldn't go another day without one.  The one flavor that took me by surprise was the Olive Oil & Vanilla.  I've really been enjoying the subtle flavor it adds to desserts - ice cream, cakes, etc.

He puts chopped green olives in his, but I just wanted the smooth white chocolate, vanilla and olive oil ganache to fill mine.  I did sprinkle a pinch of some high quality sea salt to fill in for the brined olives.

If you're too lazy to make your own macarons, I recommend Bouchon Bakery at Rockefeller Center.


The ganache mise en place.


Macaron a l’Huile d’ Olive et Vanille
an original recipe by Pierre Hermé

Olive Oil Ganache

60 grams whipping cream
1/4 vanilla pod
90 grams high quality olive oil
135 grams Ivoire couverture (chopped)
Put the heavy cream into a small pot with the vanilla bean pod and bring to a boil.  Take off the heat and remove pod.  Pour into a bowl containing the white chocolate and allow to sit for three minutes.  Whisk to form a ganache.  Slowly drizzle in the olive oil while whisking to emulsify.  Let sit at room temperature, stirring often until the ganache sets.
Almond Sugar Mix for Macaron
200 grams whole white almonds
200 grams confectioner’s sugar
Process the whole white almond in a food processor, add the icing sugar and process once more. Sieve.
Green Macaron Mix
1)
400 grams almond-sugar mix
75 grams fresh egg whites
1 gram green food coloring
2)
200 grams sugar
50 grams water
75 grams old egg whites
1.5 grams egg white powder
Combine all ingredients together from list 1) ( do this only right before you begin your sugar syrup, otherwise you will end up with an unblendable mass). cook the water and caster sugar to 245F. When the syrup reaches 226F start whipping on medium speed the egg whites with the egg white powder to stiff peaks. Pour slowly the cooked syrup in a trickle over the meringue. Leave to cool down to 122F, take the bowl out and fold the meringue progressively into the first mixture. Add a third of the meringue to lighten the mixture and then fold in the remaining meringue.  Continue folding until the batter is slightly loose.
Piping and baking the macarons
With a piping bag fitted with a plain round nozzle, pipe macarons on tray lined with parchment paper. Bake in a convection oven at 320F (or conventional at 350) for about 14/15 minutes. Once baked, slide the macarons on cooling rack to cool.
When the shells have cooled and when the ganache has reached pipable consistency, fill one shell with a nice dollop of ganache and a pinch of fine sea salt, top with another macaron, making sure to assemble 2 shells of the same size.
Store in refrigerator for at least 24 hours before consuming. Take out of refrigerator, 2 hours before consumption.

Wednesday, March 20, 2013

A Touch of the Blarney


For the past couple of years my friends have been having a cooking competition.  This year, since I have nothing better to do, I'm going - and, as a judge.  The theme of this year's smackdown was - meatballs!  I didn't want to show up empty-handed so I figured I'd make something "Irish" to bring.  This is when I realized how I am SO not Irish.  I don't think I've ever eaten an authentic Irish meal.  (This is a lie.  I did in Killarney.  Some stew of sorts, but thats neither here, nor there...)  Since baking is my thing,  Irish Soda Bread sounded like the most logical choice.

The crust of the traditional loaf


I think I've tried it once in my life - and I wasn't a fan.  I really am not even sure what it is.  Cue research.  An authentic, traditional soda bread has only four ingredients: flour, salt, baking soda and buttermilk.  It should have a tender crumb with a rough-textured, crunchy crust.  Of course, it has been Americanized.  How?  By adding sugar, butter, and inclusions!  (Caraway seeds and raisins.)  Let's make it sweeter and fattier Céad míle fáilte to America.
The Americanized version.

I decided to make a variation of each.  The traditional version was way to bland for me, plus, I am not really a fan of buttermilk as a featured flavor.  The crumb and crust, however, were spot on.  The Americanized version appealed to my palate a lot more.  It still had a delicate crumb and crunchy crust but, with some sweetness and a decent bit of butter, had a lovely anise scent and flavor from the caraway seeds.

Caraway Seeds & Raisins.

Would I make it again?  Eh, maybe next St. Patty's Day...

Erin go bragh!

P.S.  Congrats to Lindsay for making the most least-offensive meatball!!

Sunday, March 10, 2013

A Visit To The Winery


Last weekend I got to celebrate the birthday of a good friend from high school.  We had a bus pick us up at 10am (you know you're getting old when the party starts so damn early!) to escorted us to Renault Winery in South Jersey.  We took part in a wine tasting and tour before heading across the street to dine at Joseph's Restaurant. 

I was honored when the birthday girl, Lauren - or Smitty as we call her - asked me to make her cake.  When I asked her what she wanted, her response was, "I love purple."  Hmmmm.

Since we were headed to a winery, I wanted to incorporate that into the theme, but not in the presentation - a cake with grapes just reminds me of a retirement party, wedding in Napa or an eightieth birthday party.  (FYI, Smitty has a loooooong way to go before we celebrate that!)  So, I thought it would be fun to incorporate the wine into the flavor of the cake. The biggest problem is that I don't like wine.  It's just not something I enjoy.  Every now and then I find a dessert wine or late-harvest Riesling that I like, but that's not often.  I wasn't about to let that stop me.

I knew I didn't want to flavor the cake itself or use the wine as a soaking syrup.  Unless it's a geniose, no thank you.  That left the filling.  I thought about a red wine ganache, but feared that would be too heavy.  I decided to try a red wine buttercream.  In order to maintain the consistency that I wanted, I would have to change the property of the wine.  Adding straight up liquid to the buttercream would not do me any favors.  The most logical solution was to make a jam with the wine as a base.  (Side note: I have a new found addiction for canning so this was right up my alley!!)  Once the jam was complete - and cooled - I added it to the buttercream and made a test cake, but I wasn't thrilled.  It was too fruity and the wine notes were just not coming through.  In order to maintain the concentrated flavor, I spread it on the vanilla cake and topped it with a layer of vanilla buttercream.  It still fell flat - very one note and blah.  I was at a momentary loss, however, when in doubt - add nutella! 

I made another batch of vanilla cake, spread a layer of the jam on it and topped it off with a layer of nutella buttercream - GREAT SUCCESS!! 

As far as the decorations, I covered the cake with purple fondant and applied hand-painted "sequins" in various shades of purple and silver to create a broken mosaic.  Since ombre is in fashion, I figured it would be fun! 

Red Wine Jam - adapted from Ball Complete Book of Home Preserving

3 1/4 cups dry red wine (use something you like but keep it cheap!)
1/2 cup fresh lemon juice
1 vanilla bean, split and scraped
50 grams fruit pectin
4 1/2 cups sugar.

Prepare six 8-oz jars.  (Google how to do this!!)

In a large bowl, carefully whisk together the sugar and pectin, set aside.
In a large, deep stainless steal sauce pan, combine the wine, lemon juice, vanilla pulp and bean.  Bring to a simmer and turn off heat.  Let steep 30 minutes. 
After steeping, remove the bean and bring the wine mixture to a boil over high heat, stirring frequently.
Add the sugar mixture in one addition, stirring constantly.
Allow to come to a full boil, stirring constantly, for two minutes.
Remove from heat.
Skim off foam, if any, and quickly pour into prepared jars leaving 1/4 inch of head space.
Wipe rim, apply center lid and screw band down until fingertip-tight.
Process the jars for 10 minutes in boiling water.
Remove jars, cool, and store in a cool, dark place.

Be sure to label!  These bad boys have a shelf life of a year.  Enjoy!


Saturday, February 2, 2013

Hail to the King...


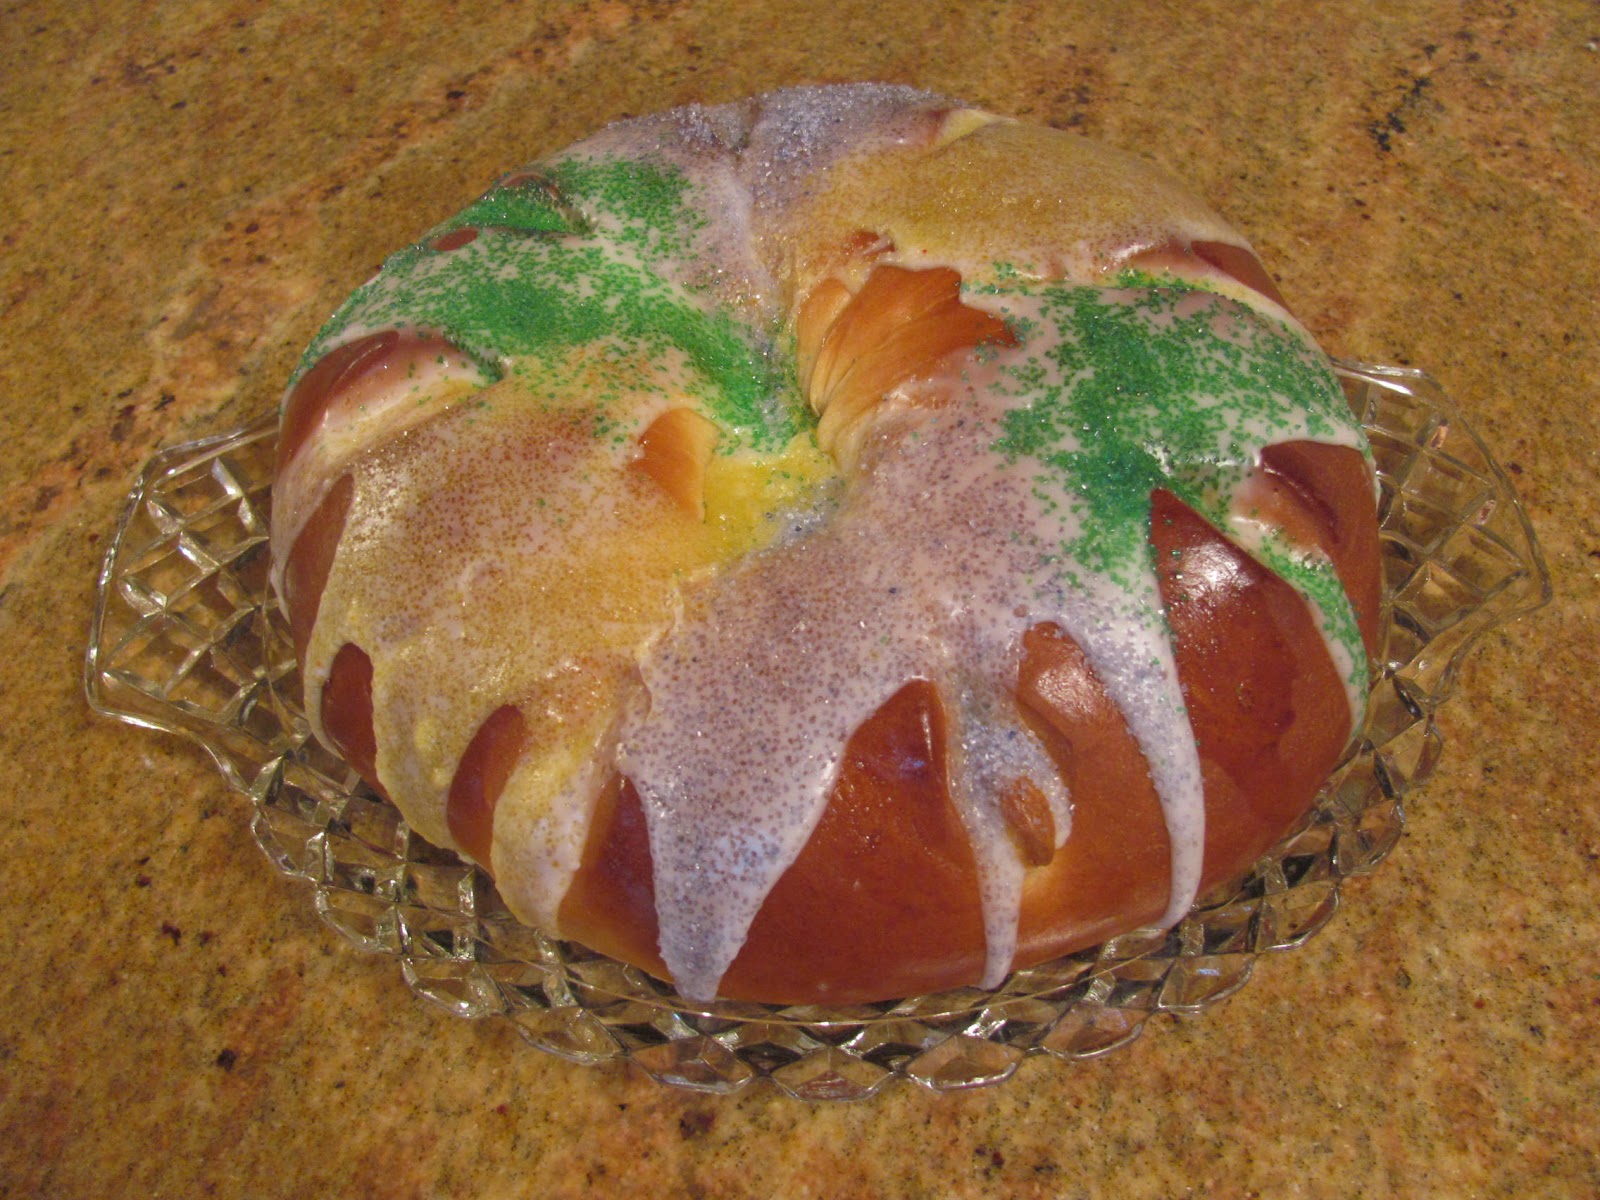
I've always wanted to make a King's Cake, but whenever I think of it, the season has passed.  The cake is typically served on the Epiphany (12 days after Christmas) through Mardi Gras.  It is rare to come across this cake in the Northeast - it's more of a Gulf Coast kind of goodie.  The cake was supposedly brought to that region from France and Spain where it is associated with Carnival (also known as Mardi Gras.)  When I saw that this cake was featured in The New York Times Dining Section this past week, I decided I should finally make it!  

The cake is usually "stuffed" with a trinket.  The traditional trinket is a bean, however, nowadays, a plastic infant is inserted into the cake after it is baked.  Whoever gets the slice with the trinket is king (or queen) for a day!  Another tradition is that the person who gets the trinket is responsible for bringing a King's Cake to the next appropriate occasion.

Because there are so many different countries that make their own version of the cake, it is hard to figure out what the original cake may have been.  To my knowledge, the most traditional version is a yeast "cake" rolled with a cinnamon sugar (think cinnamon roll,) shaped into a ring and glazed with icing and sprinkles.  At some point, fillings were added - the most popular being a cherry/cream cheese mix.  Other variations I've come across include chocolate, praline or straight-up pie filling.  Being that there were so many options, I decided to make it non-traditional and made a cream cheese filling.  As far as the sprinkles go, the colors - purple, green and gold - are the traditional colors of Mardi Gras.  And, coincidentally, there are three colors - one for each of the three Kings that visited Jesus.

The recipe reads as an enriched bread recipe and the characteristics are the same, so I'm not sure why it's a cake. I guess cake is more regal than bread?  With that said, who cares what is called!


The dough is rolled into a rectangle with the filling spread on top and rolled.  The log is then shaped into a ring and scored with a razor.  This gives it cool looking grooves and, more importantly, controls the shape of the cake during baking.


Fresh out of the oven.


Getting the sprinkles together while the cake is cooling.  Did you know - you can dye sugar by adding a drop of food color and mixing well.  Do this by hand, but be sure to wear a glove.


The finished King's Cake!!  By the way, I didn't bother putting a trinket in it.  We all know I'm the King. ;)

Thursday, July 12, 2012

Hot Chocolate


I'm in Chicago for a few days to meet up with a couple of friends and there is such an amazing food scene here  Choosing which restaurants to visit is not easy!  Being my first night in town, I wanted to hit up Hot Chocolate.  This cute restaurant is the home of Chef Mindy Segal.  She is this year's recipient of the James Beard Award for Outstanding Pastry Chef.  Located in a "hipsterish" segment of the city, the restaurant creates a very comfortable, trendy ambiance.

I had a cosy seat in the corner of the restaurant. My server, Dan, was phenomenal. He was extremely knowledgeable and offered a lot of information about where their food was sourced and what I needed to try.

I started my meal with the Mac & Cheese. How could I resist - its in a category of its own on the menu. Usually when I order a Mac & Cheese, I am disappointed, however,  this one was so good, I finished it all and practically licked the crock bowl clean. It was super creamy and came
straight from the broiler with a charred top! 

For my meal, I ordered the house-ground burger. It was topped with organic bacon and 4-year aged cheddar on a sesame seed bun and served with cottage chips and slaw.   It didn't wow me like that Mac & Cheese, but it was a darn good burger!

Picking dessert was so difficult. I was instantly drawn to the skillet souffle and doughnuts, (see descriptions below) but ultimately decided on the study.

Skillet souffle
Gooey, chocolate skillet souffle, salted caramel ice cream, pretzels

Doughnuts
Brioche doughnut squares, hot fudge and caramel corn


Study
Flavor of the season we choose to reflect upon and handcraft together to present
you with an experience in textures and temperatures

This seasons study was on cherries - one of my favorites!  The cherries come from Mich Clug Farms. (Check out their site http://mickklugfarm.com/)

The tasting was the following...

Cocktail
Classic Manhattan spiked with cherry liquor

Sundae
Vanilla bean ice cream
Sour cherry sorbet
Balaton
Cherry jubilee

Custard
Brown butter cherry clafoutis

Cake
Black forest cake
White chocolate cream
Port wine cherries

Cookie
Tart dried cherry and pistachio biscotti


Words cannot begin to express how great this tasting was. I spent ten minutes trying to decide what my favorite component was, but even the biscotti blew me away!!   It was the perfect texture (for me anyway) and had a hint of sweetness from the cherries.

The black forest cake was beautifully presented and plain-old delicious! The sundae was very good, too. The sourness of the sorbet coupled with the sweetness of the ice cream and cherry sauce paired perfectly.

If I had to choose a standout, it would be the clafoutis. It is probably the component I was least looking forward to (with the exception of the cocktail, since I'm not a drinker) that I wasn't expecting it to BE SO GOOD!  It was served in a mini mason jar and was nice and warm allowing the tiny scoop of brown butter ice cream which started to melt on the warm custard. Amazing, amazing, AMAZING!!

As I was preparing to leave, Dan informed my that Chef was sending a little something extra for me to try.  A sampling of Lemon Chess, Banana Butterscotch and Salted Caramel Ice Cream were placed in front of me and I was super excited!  All three were packed with flavor and were the perfect ending to a perfect meal.  Chef Mindy came over to introduce herself and we chatted for a few minutes.  What a nice lady and amazing chef!  No wonder her motto is, "Eat seasonally, drink chocolate, and always save room for dessert!"

Sunday, July 1, 2012

You Get What You Get


This weekend was another crazy one for us at Layers NYC!  Our first cake was for a graduation and featured the ever-so-popular Hello Kitty.  Check out the Layers NYC page or Emma's blog to learn more about it!

Our second cake was for a close friend of the family, Michelle.  She planned a surprise party for her fiance, Billy, and wanted a cake in the shape of his favorite bottle of booze - The Macallan.

We were pretty excited about making the bottle., but we knew the cake needed another element to add some texture.  I decided to make a "box" to house the cake.  After whipping up a batch of pastiage (similar to fondant but it dries out completely), I created "wood" pannels.  When dried, the box was assembled and Emma did an awesome job coloring the piece

The cake - vanilla on vanilla - was covered in fondant and given a shiny coat and a label in the likeness of the one on the actual Macallan's bottle.  Special thanks to Christine for creating the art used to make it!

After the cake was made, we slipped it into the box. 

Cheers!


The finished cake.
Detail of the box.